Solar Battery Installation: Step-by-Step Guide for Homeowners 2026
Important Safety Notice
Before you begin: Installing a solar battery system involves high-voltage DC electricity (typically 48V-400V). Improper installation can result in:
- Electrical shock (potentially fatal)
- Fire hazard from incorrect wiring
- Voided warranties on equipment
- Insurance coverage issues
- Code violations requiring costly rework
Our Recommendation: Unless you're a licensed electrician with solar experience, hire a certified installer. This guide is for educational purposes to help you understand the process and ask informed questions.
Chapter 1: Pre-Installation Planning
1.1 Determine Your System Requirements
Step 1: Calculate Daily Energy Consumption
Review your electricity bills for the past 12 months:
Monthly kWh / 30 = Daily kWh consumption
Example: 750 kWh / 30 = 25 kWh/day
Step 2: Identify Critical Loads
| Appliance | Watts | Hours/Day | Daily kWh |
|---|---|---|---|
| Refrigerator | 150W | 24 | 3.6 |
| Freezer | 150W | 24 | 3.6 |
| LED Lights (10x) | 100W | 6 | 0.6 |
| WiFi Router | 20W | 24 | 0.48 |
| Well Pump | 800W | 1 | 0.8 |
| Total Critical Loads | 9.48 kWh |
Step 3: Determine Backup Duration
- Basic backup (4-8 hours): Size for 1 day of critical loads
- Extended backup (1-2 days): Size for 2-3 days of critical loads
- Energy independence (3+ days): Size for 3-5 days + solar recharge
Recommended Battery Capacity:
Daily Critical Loads x Days of Backup / Depth of Discharge = Required Capacity

Example: 9.48 kWh x 2 days / 0.90 (LiFePO4) = 21 kWh battery
1.2 Choose Your System Configuration
Option A: AC-Coupled System (Most Common for Retrofits)
Solar Panels - Solar Inverter - Home Panel - Battery Inverter - Battery
                              |
                           Grid
Pros: Easy retrofit, works with existing solar, multiple battery options
Cons: Slightly lower efficiency, more components
Option B: DC-Coupled System (Best for New Installations)
Solar Panels - Hybrid Inverter - Battery
                      |
                 Home Panel - Grid
Pros: Higher efficiency, fewer components, lower cost
Cons: Requires hybrid inverter, harder to retrofit
Chapter 2: Installation Process
2.1 Turn Off Power (Critical Safety Step!)
WARNING: This step is life-critical. Follow exactly.
For Grid-Tied Systems:
- Notify Utility (if required by your interconnection agreement)
- Turn off main AC breaker at the service panel
- Verify power is off using voltage tester at:
- Main breaker output
- Any circuits you'll be working on
- Apply lockout/tagout to prevent accidental re-energizing
- Turn off solar inverter (DC disconnect)
- Wait 5 minutes for capacitors to discharge
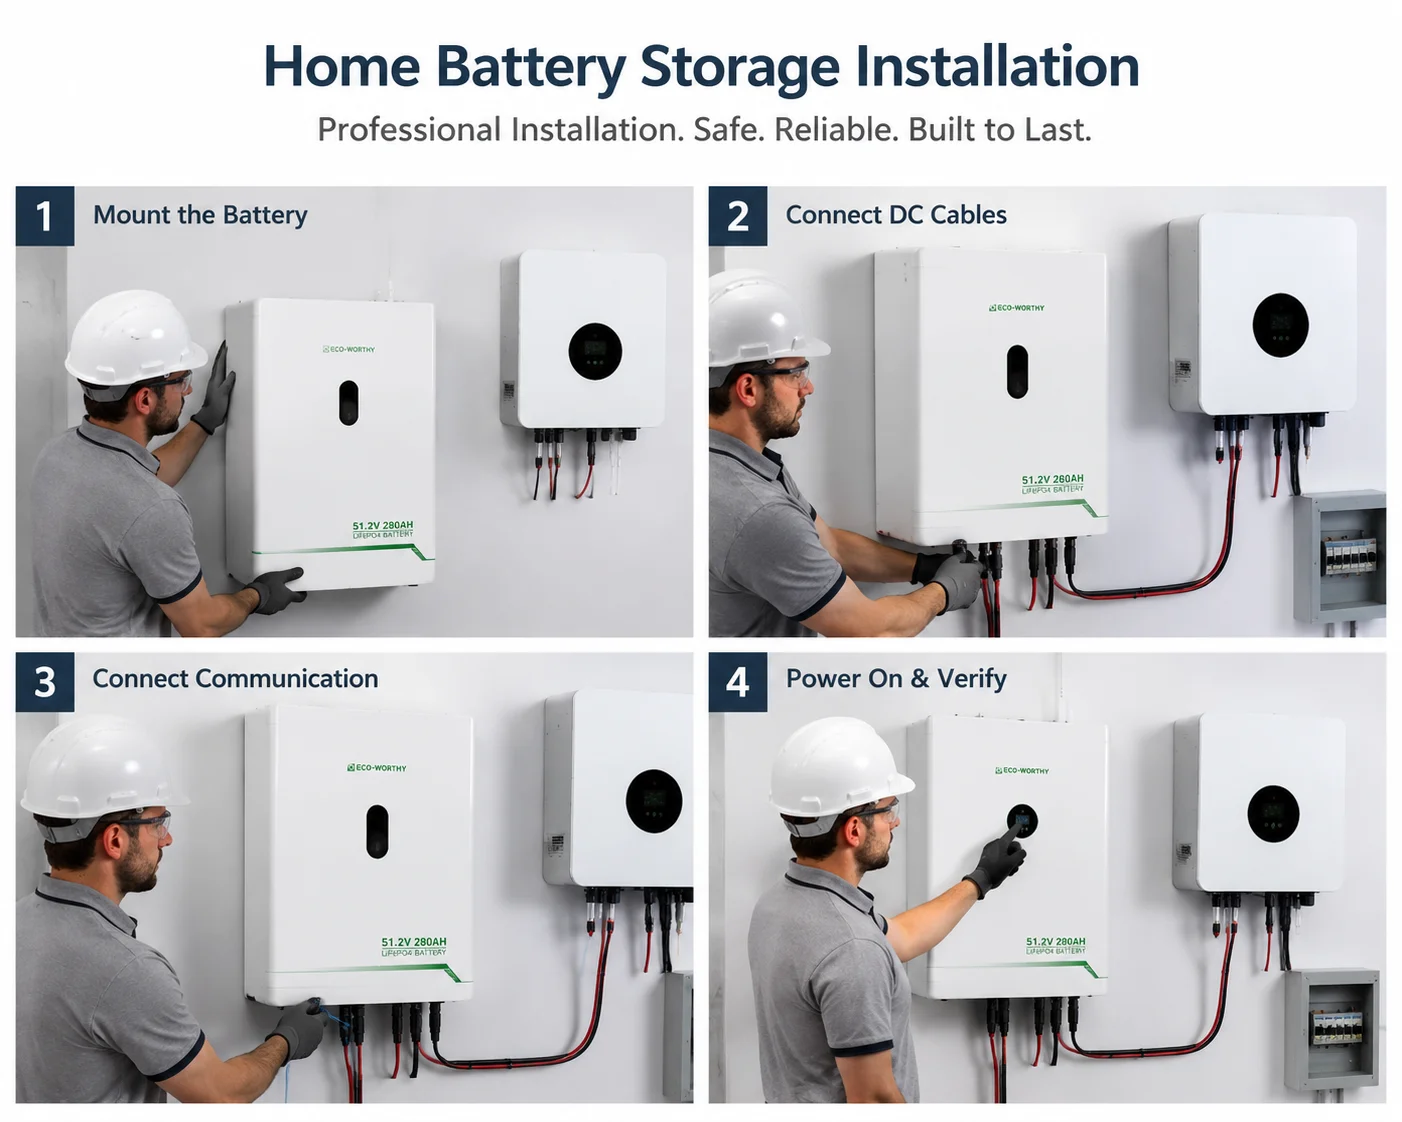
2.2 Mount the Battery System
Wall-Mount Installation:
- Hold bracket against wall at marked location
- Use level to ensure plumb
- Mark drill holes through bracket
- Drill pilot holes (slightly smaller than lag bolts)
- Apply thread-locking compound to bolts
- Secure bracket with lag bolts (torque to spec, typically 40-50 Nm)
- Verify bracket is secure (apply body weight gently)
Floor-Stand Installation:
- Prepare Level Surface (concrete pad or reinforced flooring)
- Level within 5mm over 1 meter
- Secure Battery Rack to floor (concrete anchors or bolts)
- Ensure stability (tip-resistant)
- Ground the rack
2.3 Install DC Disconnects
Purpose: Allows safe isolation of battery for maintenance
Location: Within sight of battery, 1.2-1.5m from floor
Wiring:
Battery Positive (+) - DC Disconnect Input - DC Disconnect Output - Inverter DC+
Battery Negative (-) - DC Disconnect Input - DC Disconnect Output - Inverter DC-
2.4 Connect to Inverter
Hybrid Inverter DC Connections:
- Verify inverter DC input voltage range matches battery (e.g., 40-60V DC for 48V battery system)
- Connect battery cables to inverter DC terminals:
- Battery (+) - Inverter PV/BAT (+)
- Battery (-) - Inverter PV/BAT (-)
- Torque terminals to specification
- Connect communication cable (if applicable): RS485, CAN, or Ethernet
- Double-check all connections before proceeding
Chapter 3: Testing and Commissioning
3.1 Pre-Energization Checks
- All connections torqued to specification
- Polarity verified (no reverse connections)
- Grounding continuity verified
- Cable insulation intact (no cuts or abrasions)
- Disconnects in OFF position
- No tools or debris in enclosures
- Covers and doors installed
3.2 Initial Power-On Test
- Measure Battery Voltage: Expected: 52-54V for fully charged 51.2V system
- Close DC Disconnect: Listen for contactor engagement (audible click)
- Check Inverter Status: Display should show "Standby" or "Battery Mode"
- Test AC Output: Verify voltage (230-240V or 115-120V) and frequency (50Hz or 60Hz)
3.3 Functional Testing
Test 1: Battery Discharge
- Turn off grid input (simulate outage)
- Verify inverter switches to battery mode (under 10ms for UPS function)
- Turn on critical loads
- Monitor battery discharge on app
- Verify loads operate normally
Test 2: Battery Charging
- Restore grid or enable solar input
- Verify inverter switches to charging mode
- Monitor charging current (should match settings)
- Verify battery percentage increases
Chapter 4: Post-Installation
4.1 Monitoring Setup
| Parameter | Normal Range | Alert Threshold |
|---|---|---|
| Battery Voltage | 48-58V | Below 44V or above 60V |
| Battery Temperature | 15-35C | Below 0C or above 45C |
| State of Charge | 20-100% | Below 20% |
| Charging Current | 0-100A | Above 120A |
4.2 Maintenance Schedule
Monthly:
- Check system status via app
- Verify no error codes
- Review energy production/consumption
Quarterly:
- Visual inspection of cables and connections
- Check for corrosion or damage
- Verify ventilation is unobstructed
- Clean dust from enclosures
Annually:
- Professional inspection recommended
- Torque check on all connections
- Firmware update check
- Battery capacity test (if available)
Installation Cost Breakdown
| Cost Component | DIY | Professional |
|---|---|---|
| Equipment | $10,000-15,000 | $10,000-15,000 |
| Permits | $200-800 | $400-1,200 |
| Installation Labor | $0 | $2,000-5,000 |
| Electrical Upgrades | $500-2,000 | $500-2,000 |
| Total | $10,700-17,800 | $12,900-23,200 |
Our Recommendation: Unless you're a licensed electrician with solar experience, hire a certified installer. The warranty protection and peace of mind are worth the additional cost.
Conclusion
Solar battery installation is a significant project that requires careful planning, proper equipment, and attention to safety. While this guide provides a comprehensive overview, we strongly recommend working with certified installers for most homeowners.
Key Takeaways:
- Plan thoroughly before purchasing equipment
- Obtain all required permits and approvals
- Prioritize safety at every step
- Test system thoroughly before final commissioning
- Set up monitoring for ongoing performance tracking
- Follow recommended maintenance schedule
Ready to get started? Contact Elecno for equipment recommendations or to find certified installers in your area.
About the Author
This installation guide was created by the technical team at Guangdong Elecno Technology Development Co., Ltd. With over 12 years of experience manufacturing and installing energy storage systems, our team has supported thousands of successful installations worldwide.
Disclaimer: This guide is for informational purposes only. Always follow local electrical codes, manufacturer instructions, and work with licensed professionals when required. Elecno is not responsible for damages or injuries resulting from improper installation.
Related Buyer Resources
For broader product matching, compare home energy storage, C&I ESS, solar inverter, and solar panel options, or use the Battery Storage Buyer Resources hub.
Buyer review notes
Installation planning should happen before the battery arrives. The buyer should confirm wall or floor location, cable length, breaker position, inverter access, ventilation, local code requirements, and the person responsible for first power-on.
For system matching, start with Home Energy Storage, then compare Solar Inverter, Solar Panel, and Battery Storage Buyer Resources. For project-specific checks, use the Contact page.
Related technical checklists: hybrid inverter compatibility checklist lifepo4 home batteries and bms parameters lifepo4 solar battery buyers checklist. External reference: U.S. Department of Energy energy storage basics.
Procurement checks to confirm before ordering
- Check battery location, mounting surface, clearance, and cable route.
- Confirm inverter compatibility and BMS protocol before installation day.
- Record protection settings, firmware versions, and alarms during commissioning.
- Keep manuals, warranty terms, and emergency shutdown notes with the handover file.
SolarStorageHub editorial note: This guide is reviewed from a distributor and EPC buyer perspective, with attention to battery configuration, inverter compatibility, certification scope, shipment evidence, installation assumptions, and warranty support.
Related runtime guide: For installation planning, the runtime guide helps connect load control, inverter selection and solar recharge with the final battery choice. Read How to Estimate Battery Storage Runtime: Usable kWh, Load Profile and Solar Recharge for Buyers.
Related buyer guide: For installation planning, this load list guide helps installers document essential circuits, inverter settings and backup expectations. Read Home Battery Storage Backup Load List: Essential Circuits, Runtime and Inverter Limits.
Related buyer guide: For installation planning, this handover checklist helps installers finish the job with clear records and user training. Read Home Battery Storage Installation Handover Checklist for Installers and Distributors.
Related buyer guide: Before installation, use this retrofit checklist to choose the AC or DC power path for the existing solar equipment. Read AC-Coupled vs DC-Coupled Home Battery Retrofit: Solar, Backup and Inverter Checklist.
FAQ
Can homeowners install a LiFePO4 solar battery themselves?
Many systems should be installed by qualified personnel because wiring, protection, communication, grounding, and local code requirements can affect safety and warranty coverage.
What should be checked before first power-on?
Confirm polarity, grounding, breaker rating, communication cable, inverter settings, battery address, and emergency shutdown behavior.
Why keep commissioning records?
Records help troubleshoot later inverter alarms, warranty claims, and expansion work.
Related SolarStorageHub Resources
If you are turning this article into a buying decision, compare the relevant product families and send your inverter model, target capacity, installation country, and quantity plan for confirmation.