
Integrated Solar Roof Tiles Maintenance Checklist: Fault Isolation, Replacement and Roof Access
Integrated solar roof tiles maintenance is not simply a matter of cleaning a photovoltaic surface. The maintenance plan has to protect three connected systems at once: DC generation, the roof weathering layer and safe access to the affected tile. A useful plan therefore identifies the exact tile and string, isolates the fault without disturbing unrelated roof areas, preserves drainage and underlay details during replacement, and records the electrical and roofing checks required before the area returns to service.
This guide is an owner, buyer and O&M planning checklist—not a live-work procedure. Isolation, roof access, removal and recommissioning must be completed by qualified parties using the project drawings, the order-specific product manual and the rules that apply at the installation location. Do not infer a safe test method, cable size, protective-device rating or access method from a generic article.
Why solar-roof maintenance needs a joined-up plan
A conventional PV service visit can often treat the modules and the roof as separate packages. With building-integrated solar tiles, a technician may need to cross the weathering surface to reach an electrical component that is also part of the roof finish. Removing the wrong piece, loading an unsupported tile, interrupting an overlap or reconnecting a mismatched component can turn one localized fault into a roofing or electrical problem.
The maintenance scope should therefore name four responsible parties or competencies: the electrical O&M provider, the roofing contractor, the access or fall-protection planner and the asset owner who controls records and approvals. One company may cover more than one role, but the hand-off points should still be written down. The U.S. Department of Energy inverter overview explains the inverter's role between DC generation and the wider electrical system; a roof-integrated asset register must preserve that electrical relationship as well as the roof-system boundary.
Build the asset register before a fault occurs
A useful solar-roof register maps every active tile to a roof zone, row, string and inverter input. It should also distinguish active PV tiles from inactive edge pieces, flashings, valleys, ridge parts and other finishing components. A photograph of the finished roof is helpful, but it does not replace a numbered layout drawing that a technician can use when a monitoring alert identifies a string or when a visual inspection identifies a physical defect.
- Identity: record model, serial or batch reference, rated values and the approved replacement part.
- Location: use a stable roof-zone and tile-position code that appears on drawings and service records.
- Electrical relationship: record string membership, polarity convention, connector system and inverter or optimizer relationship where applicable.
- Roof relationship: retain the approved batten, underlay, overlap, flashing, drainage and fixing details for that zone.
- Access relationship: show the permitted route, loading restrictions, anchor arrangements, exclusion area and rescue plan.
Keep an order-specific electrical baseline
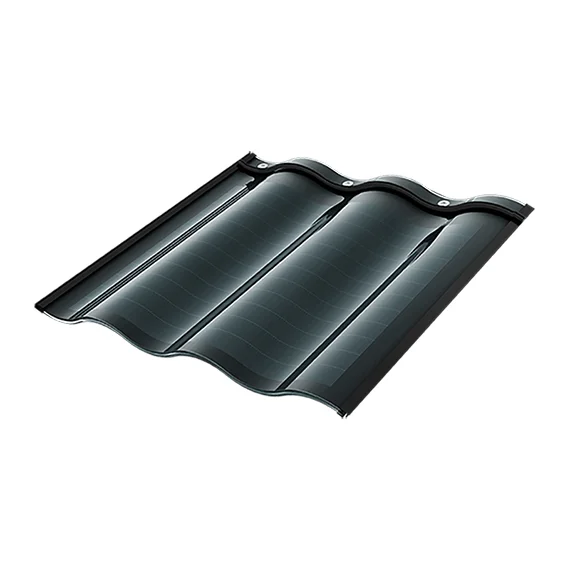
For the current 60W integrated solar roof tile page, the listed values include 60Wp, 18V Vmp, 3.3A Imp, 21.6V Voc and 3.65A Isc per active tile. The page also lists an 800 × 450mm format, 2.8kg weight and an IP68-rated junction box. These values are useful identifiers and design inputs, but they are not universal pass/fail readings for a field visit.
Baseline records should use the exact order datasheet, flash-test or acceptance data, temperature coefficients, string design and commissioning readings. Compare like with like under documented conditions. A difference can be caused by irradiance, temperature, shading, soiling, connector resistance, wiring, bypass behavior, measurement setup or the tile itself. Trend evidence and cross-checks are more useful than declaring a tile defective from one isolated number.
Use a staged fault-isolation workflow
The purpose of fault isolation is to narrow the affected area before anyone disturbs the roof. Begin with records and remote evidence: monitoring alerts, inverter events, recent weather, work history, roof-zone mapping and string behavior. Then plan a visual or thermal inspection from an approved position. Any electrical test or intrusive check should occur only under the project’s isolation procedure and within the technician’s authorization.
| Observation | Planning question | Evidence to retain | Escalation boundary |
|---|---|---|---|
| One string shows reduced or intermittent output | Does the event follow irradiance, temperature, shading or recent work? | Timestamped monitoring data, inverter event log and roof-zone map | Qualified electrical diagnosis before opening connectors or changing the string |
| Thermal pattern differs between adjacent tiles | Were images taken under comparable, documented conditions? | Original thermal and visible images, location code and environmental notes | Do not treat one thermal image as a replacement authorization |
| Crack, movement or impact damage is visible | Has the weathering layer or underlay also been affected? | Close and context photographs without unsafe access | Joint roofing and electrical review before removal |
| Moisture is reported inside the building | Is the source a tile, overlap, flashing, penetration, condensation or another roof area? | Interior and exterior location map, weather history and drainage observations | Roof investigation; do not assume an electrical enclosure rating proves roof watertightness |
Approve the roof-access plan separately
A solar roof should not become its own walkway by default. The access plan needs to state where people and equipment may travel, which surfaces may bear load, how tools and replacement parts will be secured, how the work area will be protected below, and what weather conditions stop the task. It should also identify a rescue method appropriate to the site.
Access decisions are location- and employer-specific. In the United States, the OSHA fall-protection resource provides the regulatory starting point; other countries and sites have their own requirements. The manufacturer’s roof-loading and access instructions, the building design and the competent person’s site assessment remain essential. A generic image of a harness or walkway does not prove that a real roof has an approved system.
Set replacement decision gates before removing a tile
A replacement should be authorized only after the team has identified the affected component, confirmed that removal is permitted, checked that the replacement is compatible and agreed how the roof detail will be reinstated. “Same size” is not enough. The approved replacement may also need to match electrical ratings, cell or bypass configuration, connector family, cable arrangement, mechanical interfaces, finish, overlap geometry and warranty conditions.
- Confirm the diagnosis: retain enough evidence to explain why the tile—not another system component or operating condition—is the likely cause.
- Confirm the isolation boundary: identify every circuit and energy source affected by the work and use the project procedure.
- Confirm the roof sequence: use the approved removal and reinstatement drawing, including adjacent pieces that must be lifted or protected.
- Confirm the replacement identity: check part number, batch or revision, appearance, electrical compatibility and connector details.
- Confirm the acceptance evidence: define the roofing inspection, electrical checks, photographs and records required before close-out.
Protect waterproofing and drainage during replacement
The junction-box rating on a tile does not describe the watertightness of the completed roof. Water management may depend on underlay, overlap, flashings, battens, fixings, valleys, ridges, eaves, penetrations and clear drainage paths. The maintenance record should show which layers were disturbed, who inspected them, what approved materials were used and how the reinstated area was accepted.
Do not use sealant as an undocumented substitute for the designed detail. If the original roof assembly, fastening method or inactive finishing part is unavailable, the owner should obtain an approved repair proposal before continuing. The earlier solar roof tiles output and waterproofing checklist is the better reference for pre-installation roof-system approval; this maintenance guide assumes those details already exist and focuses on preserving them.
Control spares by model, revision and finish
A practical spare-parts plan includes more than a number of active tiles. It may require inactive tiles, edge or transition pieces, approved connectors, cable assemblies, clips, fixings, underlay repair materials and documented finishing components. Store items within their environmental limits and keep their labels readable. Record any shelf-life or inspection requirement supplied by the manufacturer.
When a batch or product revision changes, do not mix components automatically. Ask the supplier to state interchangeability and any effect on electrical layout, appearance, mechanical fit, roofing details or warranty. Buyers can use the PV pre-shipment inspection checklist to define incoming evidence, while the site register should link each installed spare to its location and service date.
Recommission both the roof area and the electrical circuit
Close-out is complete only when both disciplines have accepted the work. Roofing acceptance may include the restored overlap, fixing, underlay, flashing, drainage path and visual finish. Electrical acceptance may include identity, polarity, connector engagement, routing, isolation restoration, applicable measurements and monitoring behavior. The exact checks and limits must come from the project documents and local rules.
Retain before-and-after photographs, the removed part identity, replacement identity, reason for replacement, test equipment information where relevant, signatures or approvals and the updated roof map. Keep the removed component available if a warranty or failure analysis may follow. Update the maintenance baseline instead of leaving the event only in an email thread.
Use triggers as well as calendar inspections
Calendar inspections can be useful, but a risk-based plan should also define event triggers. Examples include severe weather, impact, water ingress, unusual inverter behavior, a significant thermal anomaly, nearby roofing work, access by another contractor or a repeated fault in one batch. The response should be proportionate: some events need a record review or remote trend check, while others require a controlled site assessment.
Cleaning should follow the approved product and roof guidance. Avoid assuming that more frequent cleaning always improves results or that a generic chemical, pressure or tool is safe for the tile surface and roof assembly. Record why cleaning is needed, the method approved for the site and any defects noticed during the work.
Connect maintenance records to the rest of the system
A solar-roof issue may be visible at the inverter or battery even when the root cause is on the roof. Preserve the relationship between roof zones, strings, inverter inputs and energy-storage behavior. The PV-to-battery matching guide explains why nameplate PV alone cannot promise a recharge time, and the solar inverter range provides a starting point for system-level configuration review.
When requesting support, send the roof-zone map, exact product and order reference, inverter model, string layout, monitoring evidence, photographs and the actions already completed. Do not send only a close-up of a damaged tile without location context. Compare the wider solar product range or contact SolarStorageHub with the order-specific records for a configuration review.
Integrated solar roof tiles maintenance FAQ
Can one faulty solar roof tile be replaced without removing the whole roof?
Potentially, but only if the approved roofing system provides a defined removal and reinstatement sequence. The team must also isolate the correct electrical circuit, protect adjacent tiles and restore the weathering details. Do not assume individual replacement is possible from appearance alone.
Does a thermal image prove that a solar roof tile has failed?
No. A thermal difference is diagnostic evidence, not a complete diagnosis. Irradiance, temperature, shading, soiling, electrical conditions, camera setup and viewing angle can affect the result. Retain the original image and conditions, then follow the qualified diagnostic process.
Can a replacement tile use a different connector if its power rating matches?
Not without an approved compatibility decision. Power rating alone does not establish connector, voltage, current, bypass, cable, mechanical or roofing compatibility. Use the order-specific replacement part or obtain documented approval for the proposed revision.
How many spare solar roof tiles should an owner keep?
There is no universal quantity. The plan should consider installed quantity, supplier lead time, model-revision risk, expected service life, roof access cost and the need for matching active, inactive and finishing components. Record the agreed spare schedule in the project documents.
Who should sign off a solar roof tile replacement?
The project should define this before work begins. Close-out commonly needs appropriate electrical and roofing acceptance, plus owner record control. The exact licensed or competent roles depend on the site, contract, manufacturer instructions and local jurisdiction.
Related SolarStorageHub Resources
If you are turning this article into a buying decision, compare the relevant product families and send your inverter model, target capacity, installation country, and quantity plan for confirmation.